
What is Kapalbhati
Kapalbhati is a powerful cleansing technique technique which has been and practiced in India at least since the medieval times, if not before. Hatha Yoga Pradipika, defines Kapalbhati as follows:
Bhastraaval lohakarasya, rechapurau sasambhramau;
kapalabhatir vikhyata, kapha dosha vishoshini.
(Bhastra = Bellows; Lohakara = blacksmith; Rechak = Exhalation; Puraka = Inhalation; Vikhyata = named, Vishoshini = Dries up)
Source: https://www.learnsanskrit.cc/
This roughly defines Kapalbhati as the act of breathing like the bellows of a blacksmith which dries up Kapha Dosha. In Ayurveda, Kapha Dosha is responsible for mucus related disorders that can prevent a Yogi from optimally practicing yogic techniques.
There are six shatkriyas in Hatha Yoga that yogis do for purifying the body and Kapalbhati is one of them. That is why we also call it ‘Breath of Fire’. The name literally translates as Forehead shining Breath (Kapala = skull/forehead, bhati = light/splendor) – a reference to the fact that this practice has a direct impact on our higher brain functions. This is the reason why another name for Kapalbhati is Frontal Brain Cleansing practice.
It has many wonderful benefits and a practitioner will noticeably see the impact of a regular practice within a few weeks.
What are the benefits of Kapalbhati
Kapalbhati is an ancient practice that has physical, mental and spiritual benefits. Some benefits have a scientific basis, and others are more traditional beliefs. I am sharing most of them here.
- Clears out stale air from the lungs and purifies nasal passages
- Helps you relax and manage stress (1, 2)
- Helps with metabolic syndrome (3)
- Awakens your core (4)
- Increases your breath holding capacity*
- Improves focus and concentration (5)
- Improves digestion
- Helps in weight loss and mucus problems (6, 7)
- Enhances your will power
*Please note you should do Breath retention only if you’re trained. Or under the guidance of a teacher.
I do want to highlight here, that it’s always good to look at the benefits to find motivation and faith in these practices. But ultimately one should always maintain a wholesome yoga practice which as elements of a variety of postures, breathing exercises and mindfulness. Instead of overdoing only one technique.
For a more detailed understanding of Kapalbhati, you can download my free eBook here
How to do Kapalbhati
In Kapalbhati you do rapid exhalations by pulling in the lower belly and your inhalation is passive because it happens automatically. This may seem simple but correct understanding of these two aspects is vital to have a safe practice. So, let’s look at them in a little detail.
Step 1
Take any meditative posture or sit upright on a chair with your feet resting on the floor. Close your eyes and take a few normal breaths.
Step 2
Start exhaling forcefully (as per your capacity) by pulling in the lower belly. Do this rapidly. Doing so pushes the contents of the belly, including the diaphragm up, which forces air out of the lungs. As you release the belly everything returns back to normal and passively some air gets in the lungs – and that’s your inhalation. Do only as many rounds as comfortable. As a beginner you can start with 30 reps and then take it up to 120 reps a minute over weeks / months of regular practice. Please do read the contraindications section.
Step 3
Allow the breath to normalise and repeat up to two more times if comfortable.
Step 4
Rest in Shavasana for 5 to 10 mins
All breaths are through the nose. The essence of Kapalbhati is in a forceful contraction to exhale, and inhalation happens by itself when you fully release and relax the belly.
Kapalbhati tips for beginners
If you’re a beginner and are unable to practice Kapalbhati, it may be because the abdominal muscles are not strong enough to do so. Postures that help improve core stability can also help you perform Kapalbhati more efficiently. These include:
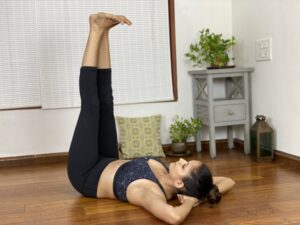
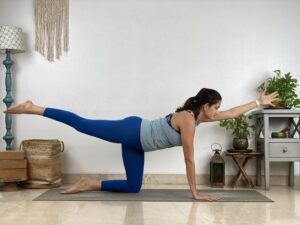
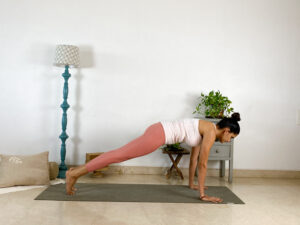
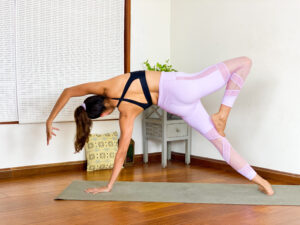
Once you build the required abdominal strength to perform Kapalbhati you can gradually start increasing speed and repetitions.
Common Mistakes during Kapalbhati
- Using the chest to breathe
The ribs are stable during the practice as you exclusively use the abdominal muscles to forcefully exhale. If you start expanding the chest or ribs to breathe, you’ll end up displacing more carbon dioxide and your work of breathing will increase. You’ll tire out faster and without enjoying the benefits.
- Inhaling actively
If you actively try to inhale during Kapalbhati you’ll end up over breathing and displacing too much CO2 from the lungs which can cause some side effects like dizziness, headaches, nausea etc. Therefore, don’t actively inhale – too much oxygen is not always a good thing. Your body will not be able to absorb this oxygen without enough CO2 and you’ll simply exhale all of it out in the next breath.
Is Kapalbhati same as Hyperventilation? Download the Free eBook here to find out.
How often should you do Kapalbhati and how many strokes?
You can do Kapalbhati twice a day, for 5 mins each time. Therefore, a total of 10 mins a day is generally sufficient for everyday life. It is important that you’re on an empty stomach before doing this practice / at least 4 hours after a meal.
Remember to begin gradually and do not attempt to do 5 mins on your very first day of practice. Everyone is unique and you are the best judge of your capacity. Generally, beginners should start with 20-30 strokes per round which they can repeat twice. Gradually week by week, you can take it up to 5 mins at a time. In terms of strokes, a seasoned practitioner would generally do 120 strokes of Kapalbhati in 1 minute. One must ensure that they do not suffer from any of the contraindicated conditions.
Be very mindful of the impact it will have on your body and mind – if you’re getting any unpleasant side effects, then you are overdoing and need to dial back. Some common side effects are irritability, anger, extreme hunger pangs, headaches, back pain etc.
If you want to practice Kapalbhati for more than 10 mins a day you should do so under the supervision or guidance of a yoga expert or therapist.
Which Posture and Mudra is good for Kapalbhati?
Posture
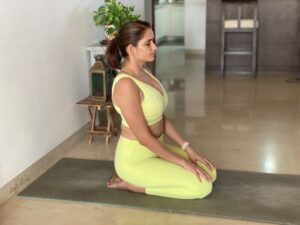
Any yogic meditative posture, is good for Kapalbhati. I personally find Vajrasana (Thunderbolt pose) more effective as it allows you to use the belly freely. If it’s difficult for you to sit cross legged or on the floor, you can sit on a chair without using back support – make sure the spine is comfortably upright and you’re not slouching.
Mudra

Your hands can be placed on the knees in any mudra of choice, though Jnana Mudra is recommended for Kapalbhati. There are many interpretations of this mudra which is often confused with Chin Mudra as well. I will share the one that I use:
- Bring the index finger to the base of the thumb
- Keep the other three fingers straight
- Palm is facing up
- Hands are resting on the knees
You’ll find it easier to practice this mudra in a cross-legged position than in Vajrasana or while sitting on a chair. If uncomfortable with hand mudra, then simply allow your hands to rest comfortably on the legs, in any way that helps you feel settled and relaxed.
Who should not do Kapalbhati
While Kapalbhati is very beneficial it can also be harmful if done in excess and can aggravate the following conditions which are contraindicated.
- Existing heart conditions
- Epilepsy
- Hernia
- Pregnant women
- Gastric ulcer
- Vertigo
- Migraines
- Nose bleed
- Retina detachment
- Glaucoma
Kapalbhati is a powerful cleansing practice that can be included in your daily routine for a myriad number of benefits – from weight loss to stress management to better concentration it is a perfect fit in our modern-day lifestyles. And whether you’re a yoga practitioner, a CEO, an athlete or a housewife – everyone can incorporate Yogic breathing practices in their lives for complete mind-body transformation.
Download the Free eBOOK ‘How to do Kapalbhati’ to learn more.
These are the additional topics covered in the eBOOK along with more detailed insight into how to do it.
- Is Kapalbhati a Kriya or Pranayama?
- Role of Transverse Abdominis in Yoga and Kapalbhati
- Is Kapalbhati same as hyperventilation?
- Some common FAQs
- I get lower abdominal pain while doing KB is that normal
- Can you do it with small hernia?
- Can KB increase acidity / can people with GERD do it?
- What is the significance of breath retention after KB
- I feel dizzy during Kapalbhati / I get headaches after Kapalbhati
Sign up to the newsletter for regular updates and useful Yoga resources


